Maintenance - Edit Menus
The menus in Micronet can be personalised to allow different people who work within a business to have access to certain areas of the software which suit their needs and restrict access to other areas. For example, invoicing staff may need access to different menu options from purchasing staff.
You use this option to customise the Micronet menus for individuals or all users of your Micronet system. You can grey menu options to prevent users from accessing them. You can also delete menu options for certain users, or create custom menus.
Before editing any of the Micronet menus, you need to consider how your security access is arranged. There are three linked areas that you need to consider:
- individual user access as part of the User ID file
- system security as part of the User ID file
- Micronet menu structures.
|
|

|
Technical Tip
Before continuing, make sure you understand the User File Update screen and its functions. It is necessary to have created a user ID without Supervisor rights (i.e. the Supervisor field is set to No on the Main tab). This should be done now if you have not completed this task already. For more details, refer to "Maintenance - Edit User IDs".
|
The EDIT MENUS option uses the system security in the User File Update screen to prevent unauthorised changes back to the original menu.
To create your own menu structures:
- Select MAINTENANCE | EDIT MENUS.
Micronet displays the Enter Menu to Edit screen.
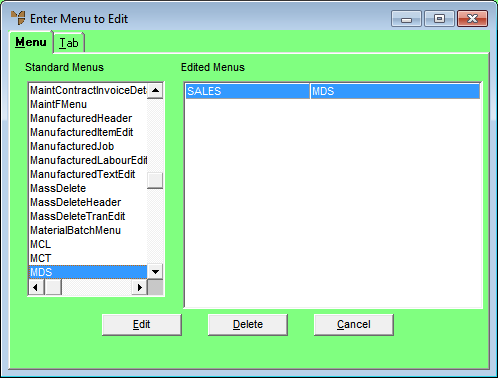
- In the Standard Menus list, select the menu you want to limit access to.
As well as using the mouse, you can use the up arrow, down arrow, Page Up, Page Down, End and Home keys.
- Select the Edit button.
Micronet displays the Edit Menu screen showing all the menu and submenu options for the menu you selected. This screen shows the menu structure for MDS.
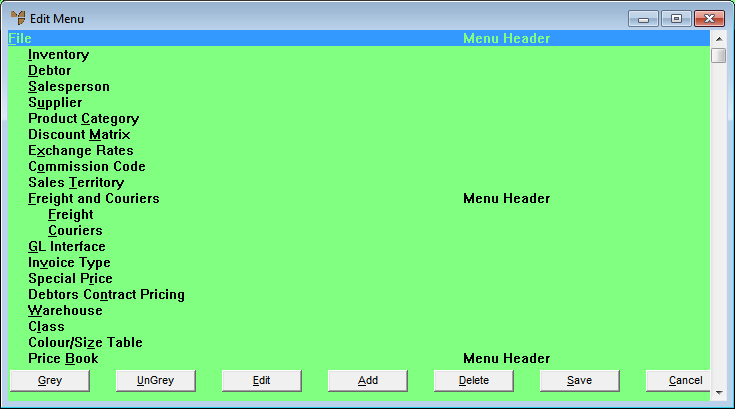
- Select a menu or submenu option.
- Select one or more of the following buttons depending on how you want to customise that menu option:
|
|
Button
|
What it does
|
|
|
Grey
|
Greyed menu options are still displayed to users but in a different colour to show that there is a menu option on the screen but they do have access to it.
|
|
|
UnGrey
|
Ungreying a menu option that has been greyed previously makes that menu available to the user again.
|
|
|
Edit
|
This allows you to edit the selected menu or submenu. For example, you could change the menu option's name.
Micronet displays the Edit/Add Menu Items screen.
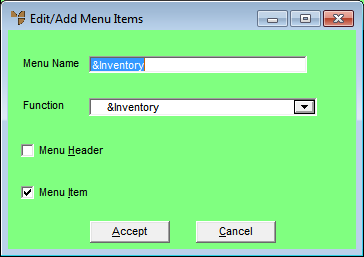
- Check one of the following options:
- Menu Header - make the selected option a menu header
- Menu Item - make the selected option a menu item.
- Leave the default Menu Name or enter a new name.
- If you checked the Menu Item box, select the Menu Function.
- Select the Accept button to save any changes, or the Cancel button to exit without saving your changes. Micronet redisplays the Edit Menu screen.
|
|
|
Add
|
This button allows you to add new menu options to this section of the menu. For example, you could create a new menu with the only options appearing to users being Invoice, Inquiry and Backorder Entry.
Micronet displays the Edit/Add Menu Items screen. See the Edit button above for information on how to use this screen.
|
|
|
Delete
|
This button allows you to delete menu selections. You would use this rather than greying where you do not want the user to see that there is a menu option available that they are not allowed to use.
|
| |
Cancel
|
Cancels any changes you have made.
|
- When you have finished customising the menu or submenu, select the Save button.
Micronet displays the Save Menu screen.
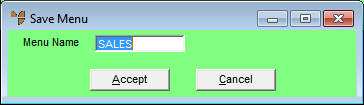
- Enter a name for your customised menu in the Menu Name field.
You will enter this name against the appropriate users when setting up user IDs.
- Select the Accept button to save any changes, or the Cancel button to exit without saving your changes.
Micronet redisplays the Enter Menu to Edit screen.
- You must now assign the menu to the appropriate user IDs.
Refer to "Example: Customising a Menu to Prevent Access to File Update Menu".